|
||||||||||||||||
| Practice session |
|
|
|
|
|
|
Exercises
|
|
||||||||
| Creating a new project | |||||||||||||
| The objective of this practice session is to begin working with JClic author by initiating and configurating a new project, which is the first step towards creating new projects.. | |||||||||||||
|
|
Start up JClic
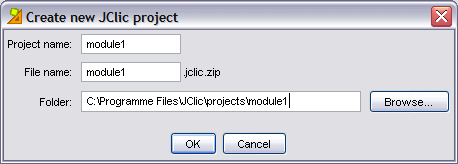
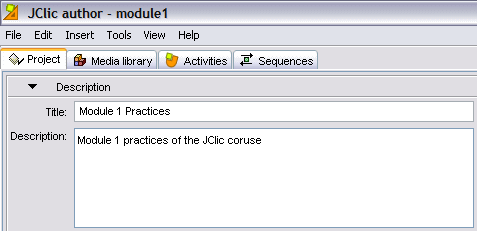
author, from the icon Go to the menu File | New Project , and in the window creation of New Project JClic fill in the box Name of Project writing module1 (all together). You can see that where it says Name of File the same name has automatically appeared and the project has also been assigned to a folder, in this case C:\Programme Files\JClic\projects\module1 in Windows, or $home/JClic/projects/module1 in other systems. Leave the name of the file and folder just as the programme suggests. Confirm with OK. Now you have created a new project, fill in some more details before beginning to create activities. Click on the tab Project.
In the section Description of this tab, write the Title of the Project and the Description. It will look like this:
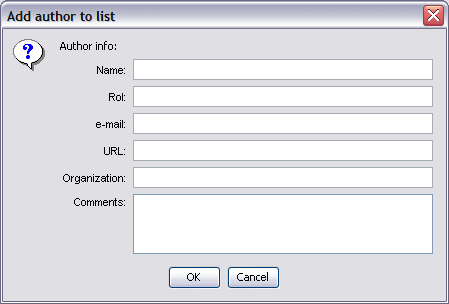
To fill in the section Creation
with your personal information you must click on the button
At the moment you are only practicing but when you make up a project there may be more than one author. If this is the case, you can add the personal information of each person one by one and they will appear on the list. Under each box there is a group of buttons:
with these buttons you can add, erase and modify the elements on the lists.
In the same way that you have introduced your personal information you can, if you wish, put that of your centre. At the moment the menu Descriptors will be left empty. Finally make sure that in the menu User Interface, Sound of event is marked and choose the skin @simple.xml. Save the project with the menu File | Save... and when the window opens confirm with Save. The project will be saved under the name module1.jclic.zip. You have created a new project, but it is still empty... there are no activities.In the next practice session you will add an activity to this project. |
||||||||||||
| |
|||||||||||||
 or from Start | Programmes | JClic | JClic author.
If this icon still hasn´t appeared or you have accidently erased it, follow the procedure which you saw in the previous practice session: start up the applications manager for Java WebStart, go to the menu See - Downloaded Applications, select the icon JClic author and activate the menu
Application - Create Direct Access (shortcuts
or abbreviated methods depending on the version).
or from Start | Programmes | JClic | JClic author.
If this icon still hasn´t appeared or you have accidently erased it, follow the procedure which you saw in the previous practice session: start up the applications manager for Java WebStart, go to the menu See - Downloaded Applications, select the icon JClic author and activate the menu
Application - Create Direct Access (shortcuts
or abbreviated methods depending on the version).