|
||||||||||||||||
| Practice session |
|
|
|
|
|
|
Exercises
|
|
||||||||
|
Making a wordsearch using related content |
|||||
| The objective of this practice session is to make a wordsearch with related content so that as the hidden wwords are found, the corresponding image appears in panel B. |
|||||
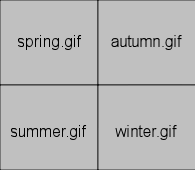
| To complete this practice session you will need the following files: spring.gif, summer.gif, autumn.gif, winter.gif, from the course material. | |||||
| Start up JClic author and open the project module2.jclic.zip. Go to the tab Media Library and with the button From the tab Activities add a new activity to the project of a wordsearch type and call it Seasons. Click on the tab Panel A and modify the dimensions of the grid until it contains 9 columns and 9 lines.
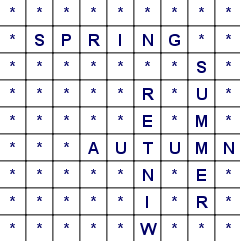
Put the words in the grid in panel A, in this case the names of the four seasons: SPRING, SUMMER, AUTUMN, WINTER. The remaining boxes have asterisks.
You can move from one box to another using the mouse or the arrows on the keyboard, and if you have to replace a letter you have written in a box for an asterisk you can do this by placing the cursor on top of the incorrect letter and touching Space, Delete or asterisk. A possible combination could be :
The following step consists of going to the box of hidden words to introduce the list of words to be found to solve the puzzle. Click on button
You have to write them in one by one and confirm. Even though you write them in small letters they will always come up as capitals because in the wordsearch they appear as such. If you want to delete,modify or put them in order you can use the buttons in the Hidden Words box which is activated when you write the first word.
The wordsearch would now be finished if you were making a simple one without related content. However, in this session, you are going to make the corresponding images appear each time a word is discovered. To do this you will use l panel B. When you tick Use Panel B two new tabs appear next to Panel A.
Click on tab Panel B and make 2 lines and y 2 columns. Click on the first box and on the window Box content . As the related content in this box are
GIF files i.e.images, click on
In the tab Distribution try out different positions for the panels on the screen. You can leave the predefined one (panel A on the left and panel B on the right).
Untick the option border in both panels A and B, so as to eliminate the outer lines of the boxes. From the tab Options and in the section Counters, go to the box that indicates the time limit for solving the activity which at the moment is at 0. This indicates that there is no time limit. Introduce the value 30, with the buttons +/-, or writing the number directly using the keyboard. You have given a time limit of 30 seconds to solve the puzzle. Tick the box Countdown, So that the time counter starts at 30 and counts down to 0.
Write an initial message, a final one and one for mistakes. This last one will appear if the activity is not solved within the given time .You do this from the tab Messages. Finish giving the messages a format by choosing the colour of the letters, the background for them, the font and size, and change the colour of the windows so that once the puzzle is solved it looks like this:
Close the test window and save the project. |
|||||
|
|
|||||
| |
|||||


