|
||||||||||||||||
| Practice session |
|
|
|
|
|
|
Exercises
|
|
||||||||
| Editing the sequence of activities in a project (II) | |
In this practice session you will make a sequence using a more complex structure linking activities. Knowing about this stucture helps you to connect between projects. In the document that you read before beginning the practice session, you were told how to jump from one point to another in a project, and how to take advantage of this function to build up a system of menus which take you to the different sections of a long project. Now we will do something similar, but linking different projects. We will try to make a project which will be the launching pad for the other four projects which you have already done. |
|
| |
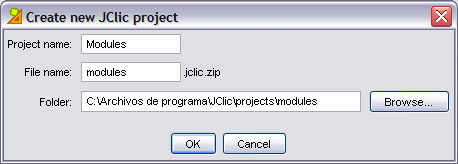
With JClic author you are going to make a new project. This time call it Modules. Create it in the folder C:\Programme files\JClic\projects\modules
In this project you have to create two activities:
Once you have done these activities go to the Sequences tab and add two elements using the button New Sequence element Apply the three modifications that we saw in the previous practice session. It should look like this:
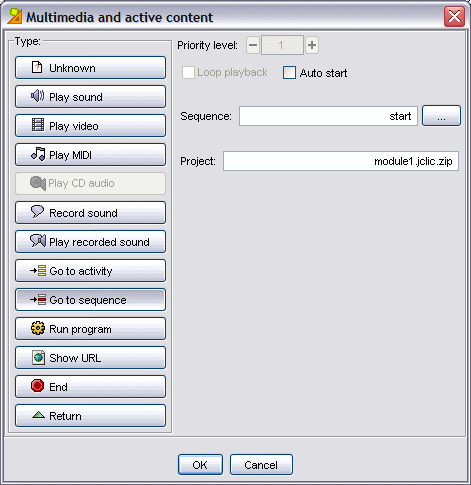
Save the project under the name modules.jclic.zip and then try them out. At the moment the boxes in the second activity do nothing. Now you should copy the files of the practice sessions from the other modules into the folder "modules". Open a file search, look for the folder C:\Programme files \JClic\projects\module1, mark the file module1.jclic.zip, press Edit | Copy, go to the neighbouring folder modules and press Edit | Paste. Repeat with the other three modules. Return to JClic author and open the project modules.jclic.zip. Now you must define the jumps from the boxes in the activity Menu to each of the projects in the modules. Click on the first box where it says "Module 1" and in the edition dialogue click on the button Active Content. In the dialogue window Multimedia and active content select the option Go to Sequence and write Start in the area Sequence and module1.jclic.zip in the area Project. It should look like this:
Do the same with the other three boxes, linking them to the projects corresponding to their modules. When you have finished, save the project modules.jclic.zip again and test that it works in the test window. You can see that when you click on any one of the boxes in the activity Menu a warning like this will appear:
This is because you are working with the visualizer inside a project, and this action is transmitted to another project. To test correctly you must close
JClic author,
open JClic, go to File | Open File...
and look for the file modules.jclic.zip in the folder modules. Now you can try out the links. If you have done this correctly, when you finish the activities in each project you should automatically return to the activity Menu. This is due to the fact that in this point of the sequence you have indicated that the forward button must obey the order to "Return" |